444
Biostar 2 is a popular access control and time & attendance management software. To add a user in Biostar 2, you typically need administrative access to the software. Here’s a general guide on how to add a user in Biostar 2:
- Log in to Biostar 2: Open your web browser and enter the URL to access the Biostar 2 login page. Enter your administrative username and password to log in.
- Navigate to User Management: Once logged in, navigate to the user management section. The exact location of this section may vary depending on the version and configuration of your Biostar 2 software.
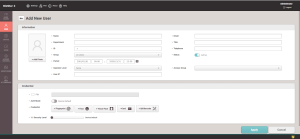
- Add a New User: Look for an option to “Add New User” or “Create User.” Click on it to start the process of adding a new user.

- Enter User Details: In the user creation form, you’ll be required to enter various details about the user, such as:
- User Information: Name, employee ID, job title, department, etc.
- Biometric Data (if applicable): Fingerprint, face, or other biometric data.
- Access Control Information: Access groups, time zones, access levels, etc.
- Assign Access Privileges: Define the access privileges for the user. This includes the doors, time zones, and areas the user is allowed to access.
- Save the User: Once you have entered all the necessary information, click on the “Save” or “Create” button to add the user to Biostar 2.
- Test User Access (optional): After adding the user, you may want to test their access to verify that the settings are correctly applied.
Please note that the user creation process may vary slightly based on the version of Biostar 2 and the specific features enabled or configured in your installation. If you encounter any difficulties or have specific questions about your Biostar 2 setup, it’s best to refer to the official documentation or seek assistance from the system administrator or the support team for Biostar 2.


